LED base lights are one of the most versatile light sources currently available. They can be used in practically any lighting project you can think of. Especially if you choose to use LED strips. What are those and how to set them up? Here’s what you need to know before buying LED strip lights.
What is a LED strip light?
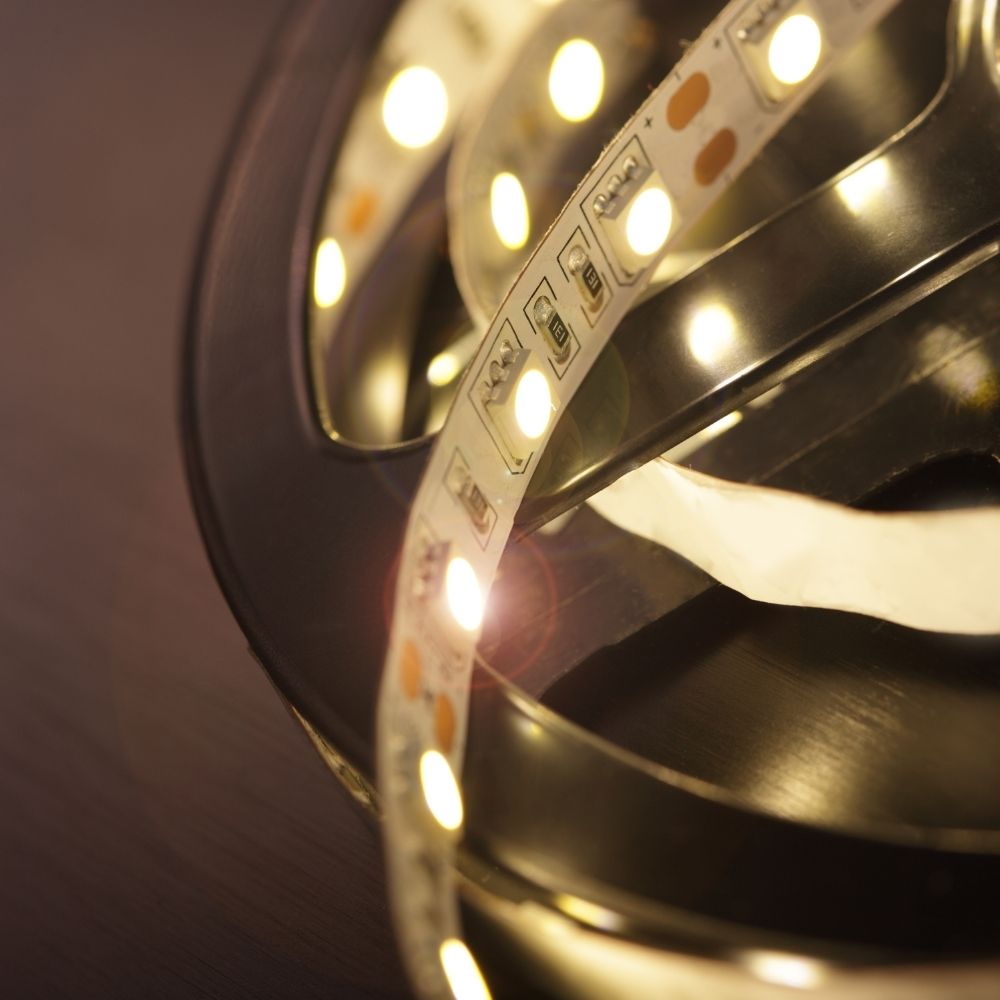
Simply put, it’s a small, strip-shaped, low-voltage circuit board with regularly placed, surface-mounted LEDs and peel-and-stick adhesive back. Thanks to its flexibility and small size, it can be set up almost anywhere – between cupboards, along banisters, under cabinets, inside wardrobes, etc. The back can stick to many different surfaces (e.g., metal, plastic, or wood), as long as they are smooth enough. A LED strip light typically comes in a long reel (ranging from 5 to 30 metres), but can be easily cut-to-length thanks to its sequential build. The cut lines are marked by copper pads.
LED strips come in three types of coating – non-waterproof, splashproof and waterproof. The level of proofing is measured by the strip’s IP rating (Ingress Protection) – the higher the number, the better the protection against the elements. The IP rating consists of two numbers. The first one comes up to 6 and tells us how well the light is protected from solid objects (e.g, dust or sand). The second one can go up to 8 and indicates the level of protection against moisture. For example, splashproof LED strip lights in general come with an IP rating of 44, while waterproof ones often have an IP67 rating.
LED lights come in many different colour options – starting from cool white and warm white, through red, green, blue, to almost any colour imaginable (there are even some UV/blacklight options out there). Some of them can have their colour changed dynamically using a dedicated RGB controller.
Installation-wise, there are two categories of LED strips – plug and play or wired. LED lights from the first category are easy to set up and can be moved around after being installed. On the other hand, wired ones are made for permanent installations and may require an electrician to be set up safely (as the process involves connecting wires). No matter the category, LED strip light requires a transformer to be connected to the electrical grid.
to choose the right LED strip lights?
Depending on the desired lighting effect, you should make sure that your LED strip lights have the right level of brightness. LED products have their brightness measured in Lumens (not Watts as some may assume) – they tell us about the total amount of visible light produced by a given light source. When it comes to LED strip lighting, its brightness is typically described in Lumens per meter and is based on the strip’s LEDs density. Strips with standard density (SD) will have 30 LEDs per meter and give off about 540 Lumens/m. High density ones (HD) double those numbers.
While considering the length of a single strip, you mustn’t make it too long – a SD one shouldn’t go over 10 m, while an HD one should be maxed at 5 m long. Why is that? If you use longer strips, the diodes will go dimmer or even flicker, as the power won’t be distributed properly between all of them.
Knowing the brightness of a light strip will help you determine if it’s suited for a given lighting project – task lighting should be way brighter than mood lighting. Here are some common examples:
- under cabinet lighting – 525-1080 Lumens/m,
- mood or accent lighting – 300-900 Lumens/m,
- bedroom or cove lighting – 540-1500 Lumens/m,
- task lighting with higher distance from the source – 900-1350 Lumens/m.
Another important aspect is colour temperature – measured in Kelvins (K). Why? Depending on the colour temperature, LED strips’ light will appear different. The higher the temperature, the cooler the light will be. This may seem confusing, as it would seem it should be the opposite. For example, a light with a colour temperature of 2 200 K will produce very warm white light, a 4 000 K one will give off neutral white light, while a 5 000 K and up ones will produce cool white light similar to daylight. Warm lights should be used in leisure areas, like living rooms or bedrooms, while cool lights are ideal for work spaces, like offices, studies, or kitchens.
Choosing the right transformer
As we already mentioned, all LED strip lights are low-voltage – most of them run on 12 or 24 V of DC. Therefore, if you want to hook them up to your home’s AC electrical installation, you’ll need a corresponding LED driver/transformer/power supply (that’s one device with a few names).
To choose the right power supply, you’ll have to know the strip’s wattage and its length – thanks to this you can determine its total wattage. You should also remember to pick up a transformer that’s at least 20% more powerful than the strip’s total wattage to avoid potential overloads. For example, if you want to power 5 m of a 10 W strip, you’ll need a 60 W transformer.
If you want your strips to be dimmable, look for transformers with ‘dimmable’ label and make sure they’re compatible with your chosen dimmer switches.
How to connect LED strip lights?
Each segment of LED strip light must be connected to a DC transformer – directly or through other segments (daisy chain). The exact connection method will depend on the transformer’s plug (if it has it) and the types of wires or plugs present on the strip light. This will vary between simple plugging and clipping/soldering the wires. When it comes to cost-efficiency, soldering wires would be the best solution. If you’re not comfortable with it, the next best things are special solderless connectors. Here’s a short summary of types of connections and things you’ll need:
Transformer with a plug:
- strip with a DC receptacle – simply plug it in,
- open wires/solderless connector – female DC adaptor,
- connection with the strip’s copper pad – requires a female DC adaptor and solderless connector (or soldering).
Transformer with open wires:
- strip with a DC receptacle – male DC adaptor,
- open wires/solderless connector – female and male DC adaptors,
- strip’s copper pad – solder and iron (or dedicated connectors).
If you plan on adding a dimming/RGB switch, it should be placed between the transformer and the strip. In case of connecting multiple strips to a single transformer using a splitter, the sequence would be: transformer, dimmer/RGB switch, splitter. While doing this, make sure your transformer can support all the connected strips.
How to mount LED strip lights?
As we already mentioned, LED strip lights come with adhesive backing, that can be stuck to a variety of surfaces. So in most cases this will suffice, especially if you plan on moving your strip lighting around. In case of rough surfaces, oily or glossy finishes, they’re sticky backs may not be enough. An easy and minimally invasive solution would be adding some adhesive 3M tape on their backs. For more permanent mounting, a few small screws with some mounting clips will do the trick.
When you want a permanent LED light strip installation or simply want to add some oomph to it, consider using aluminium profiles/mounting tracks. Besides keeping your flexible LED strip in place, they offer slick design that’ll make the lighting installation look more ‘finished’. The profiles typically come in U or V shaped (also with special variants) designs and create channels that shield the strips from mechanical damage. Most of them have plastic topping that serve as glare reducers (don’t worry – they don’t obscure the light itself). Furthermore, the profiles work great as heat sinks, which makes them great for temperature-sensitive surfaces, like plywood or wood which are susceptible to heat (not that LEDs generate much of it, but it’s better to blow on the cold).
Things to keep in mind while browsing for LED light strips
There’s a ton of different types of LED lights available on the market. This makes it really easy to buy LED strip lights with subpar quality, especially if you don’t know what to look for. Here’s what you should look into while browsing for LED strip lights:
- Strips’s surface – a high-quality strip light would have an extra layer of white paint coating. This simple treatment ups the overall light output by increasing the surface’s reflectivity. Lower quality strips don’t have that – the board’s copper colour is completely exposed. This type of lights will be less bright and the light’s colour will be different, especially if you mount them in profiles.
- Quality and quantity of LEDs – emitters directly affect the stability and quality of light output. Keeping this in mind, you should avoid LED strips that declare to have high power despite having a low number of diodes. These types of LED strips are most probably overdriven, which shortens their lifespan greatly and causes premature failures.
- Quality and composition of circuit board – the amount of copper used in a LED strip light directly impacts its ability to transport electric current – the higher the voltage, the more copper is required. Thus, you shouldn’t pick up LED strips with less than 2 oz (75.6 g) of copper weight. 3 oz (113.4 g) ones are a solid option and will be sufficient for most installations, but if you want to make sure that the voltage won’t drop while dealing with high power, 4 oz (151.2 g) boards are the best choice.
LED strip lighting – easy way to brighten your home
Thanks to their flexibility, LED strips can be successfully used in almost any place. They work great both as task and mood lights (especially RGB LED strip lights) and are easy to set up and control. With some extra options like dimming or changing colours, they’re one of the best LED lighting options that can brighten up your home without driving the electrical bills up.
Pin It!